The table saw is a really important cutting tool for woodworking. When the table saw is used we have to face many problems. Among them, saw blade wobble is one of them. When there is any wobble in the saw blade, its tolerance can be increased higher, and the material is also wasted. In my 10 years of experience, I could find these 07 reasons for table saw blade wobble, and also I could find how to prevent them easily.
A table saw blade wobbles due to these reasons, such as using a bent blade, dirt arbor, bent arbor, bearing problem, debris between washer and arbor, loose nuts, and splinterings in washers. After you fix these reasons, fix the saw blade as it is perpendicular to the arbor.
The table saw blade is wobbling due to the above reasons. So, first of all, we must identify the reason and then apply the solution. So let’s see What solutions that we can apply to stop the saw blade wobble are?. So let’s see it all in detail.
What is Table Saw Blade Wobble?
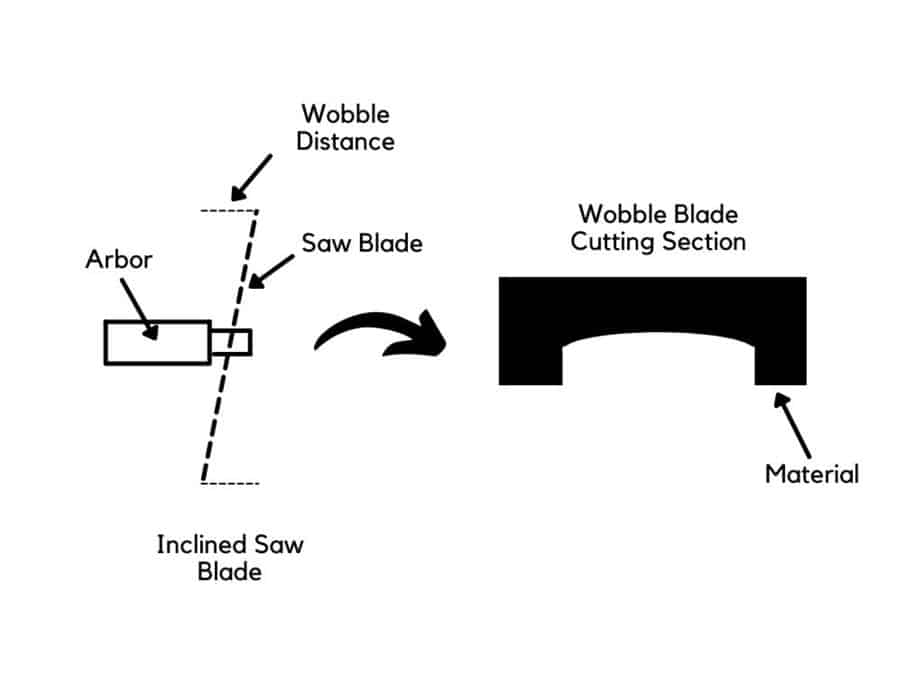
When the table saw blade is not perpendicular to the arbor is called wobble. When the saw blade is wobbled, its tolerance increases with a wider cutting path. The cutting path is not with exactly perpendicular surfaces, and there is an arc in the mid-surface.
How to Check Table Saw Blade Wobble?
It is important to know, how to check is there any wobble in the saw blade. Generally, you can use the simple method as well as a detailed method for this.
Simply you can mark the point in the saw blade teeth and then keep the ruler as it nearly touches it. Then, rotate the saw blade as you meet the mark again (360 degrees). While you are rotating, do not move the ruler here and there. Fix it tightly. So you can see the space between the ruler and saw blade increases and decreases.
If you observe this. There is a wobble in the blade. To find the reason for that and fix it.
Another method is using a dial indicator to measure the exact distance. At about 1″ from the tips of the teeth, a .002″ variation or less is good. But a .005″ variation or more won’t give a clean-cut

What are the Reasons for Table Saw Wobbling?
1. Using A Bent Saw Blade
When the saw blade is used, we must check whether it is flat. Sometimes we can see saw blade has bent due to many external forces. Sometimes it can bend due to unexpected steel cutting inside the wood. If there is a small inclination on the diameter, it can wobble easily. So keep the blade on the flat surface and then check if there are any inclinations.
If there is small bending, you can fix it by using a hammer. Do not hit the hammer directly to the blade. It will damage and then will make additional friction with the workpiece. So you had better use any wood piece on the blade and then hit to that as the blade can be bent.
2. Dirty Table Saw Arbor
Arbor is the steel rod that we can tight the saw blade and nuts together. When we work for a long time with wood, dust can spread everywhere, and some parts can rust due to atmospheric water. As a result of this, some edges are also heavily covered with rust, sawdust, lignin, etc. When we tighten everything together, those will not tighten well due to debris on the arbor. So make sure the arbor is clean and free from dust.
Suppose the arbor is not clean use a tool cleaner to clean the arbor. After that fit all together.
3. Bent Table Saw Arbor
This is a possible thing that we can expect from the tool. So as I explained above, the arbor is a steel rod, and it is used to fix the saw blade with a flange. When the saw table is running, it can heat. As a result of this arbor can be damaged due to some reasons. We can’t neglect that. Because it is a possible thing. So make sure your arbor is straight as it can tighten the plunge and saw blade together.
4. Table Saw Bearings Are Worn Out
Bearings are used to connect the arbor and table saw. When the bearings are worn out, you can hear some abnormal noise from the beginning. So pay attention and make sure the bearings are worn out, or is there any problem with the bearings? When the bearings are worn out, all alignments can be changed. When the alignment is changed, the saw blade can wobble.
You can observe this with your hand. You had better check the saw blade using your hand by moving towards. If there is higher tolerance, it is probably a bearing problem.
5. Extra Tighten Belt in Table Saw
If your saw blade arbor is connected to the belt and motor, you must pay attention to the belt tightness. When the belt is tightened highly, it can pull a side strongly. As a result of this, bearings can be worked out easily, and saw blades can be wobble due to tension. So tighten the saw blade belt as a recommended value. Do not overtight it. Also do not lower tight it. It will slip the belt when there is a load to the saw blade.
6. Loosen Nuts and Bolts in the Table Saw
This is a really common situation. Normally, nuts and bolts can be loosened due to vibration. This is rare but possible. So before you start the saw table, check for any losing parts. This can be observed with the noise of the table saw. If there is a loose part, tighten it before use. It can prevent many problems.
7. Splinterings in Washers in Table Saw
We use washers when the arbor and the saw blade is tightened together. Sometimes, washers can be splintering due to the long run. When you use it next time, those splinterings can clog the thread, and then the blade will tight as an inclined one. So make sure the washers and flange are really flat and free from debris
How to Prevent Table Saw Wobbling?
You can prevent table saw blade wobbling by following the below 7 steps.
- Check and tighten all the bolts and screws on the table saw.
- Ensure that the table saw is placed on a stable and level surface.
- Use a quality and sturdy table saw stand or base.
- Check and adjust the blade alignment.
- Install a high-quality blade that is compatible with the table saw.
- Avoid putting excessive pressure or force on the table saw while cutting.
- Clean the table saw regularly to prevent the buildup of sawdust and debris.
What is a DODO Cut?
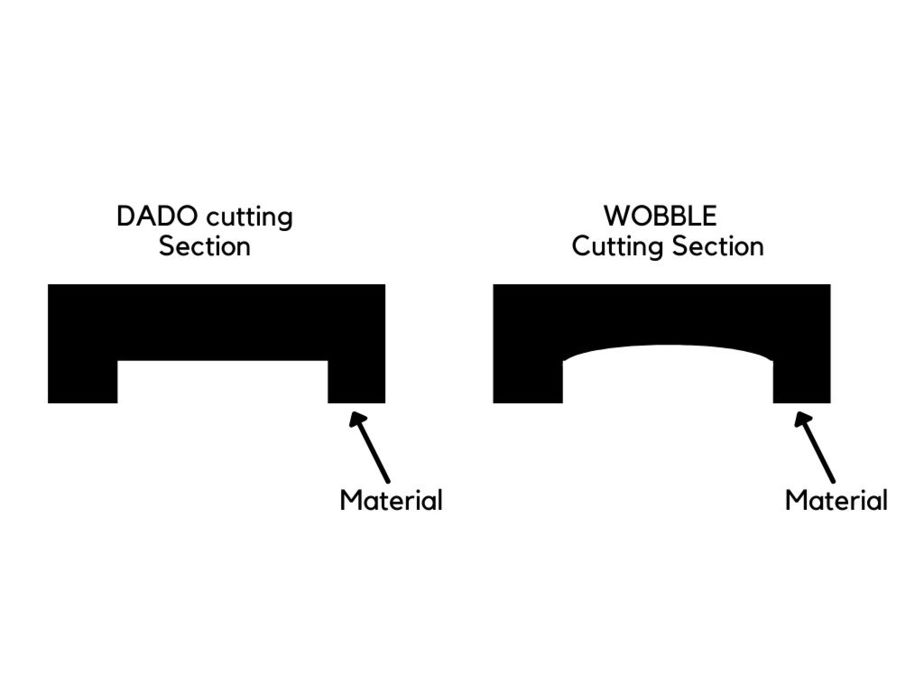
When there is a wobble in the saw blade, we can use it as a DADO cut. A wobble blade can remove the workpiece material with perpendicular surfaces. But the middle surface is not exactly flat. It is like a curve shape.
When the blade is rotating with the wobble, its far end and mid-end have two different lengths. As a result of this cut is an arc shape. This is not 100% accurate with the DADO cut due to the arc shape. But it is an optional way to DADO cut.