We need to drill through tiles for plumbing, wiring, anchoring, or plugging, and many more. Tile is one of the major construction materials. Tiles are really hard, and it is made under high pressure. Working with tiles needs more strength tools and more powerful tools. Therefore drilling through tile is a really hard and careful job by small mistakes that can be cracked. So let’s see how to do this step by step.
If we are not able to drill properly through the tile, it can be cracked. There are types of tiles such as porcelain, ceramic, and natural stone tiles. All are different in strength and quality. So when we are drilling that we have to pay attention to this step by step, so keep reading on until the end.
What You Should Know Before Start Tile Drilling?
The most important thing is the case study. Before selecting a drill bit, drill, or any other tool, you must inquire about the drilling area and materials. When you carefully visit that, you can observe the tile types and inner construction, etc. let’s see what you should study.’
01. Tile-types and Strength
There are 2 main types of tiles. Those are ceramic and porcelain. Both are used for the construction process. As I mentioned above, tile is more strong and hard. You can observe the compressive strength of the porcelain and ceramic tiles as well as regular using concrete and stone as below.
Porcelain tile – 25000-50000 psi
Ceramic tile – 40000- 120000 psi
Concrete – 2500 – 4000 psi
Marble to Granite – 1800-19000 psi
According to this, you can observe tiles are more strong than concrete or stone. Therefore you should have an idea about the drilling material. According to that, you can select suitable tools.
02. Inner Material of the Tile
When you are drilling through tile, you may be looking for a mounting plug or use an anchor. For this, you need to drill about 2-5″ inside the material. Tiles are most about 5-10 mm thick. So you have to drill only 5-10 mm through the tile and then drill into the inner material.
Inner material can be wood, concrete, brick, or any. So you should have a second drill bit that can drill inner material easily. You may not use a tile bit for drilling that material.
03. Plumbings and Wiring below the Tiled Area
Plumbings and wirings should be protected during the drilling process. You can use a material detector for detecting any material inside the wall. Sometimes plumbings and wirings may go through the wall if we drill through those, they can be damaged as well as we are also shocked by the electricity.
So it is better to make sure there is no plumbing and wiring inside.
What are the 6 Steps of Tile Drilling?
1. Select the Suitable Drill for Tiles
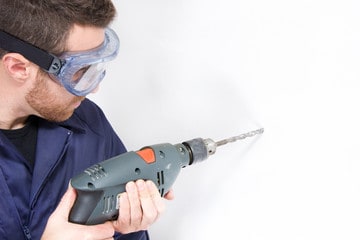
There are many types of drills available in the market. In this step, you should select a suitable drilling machine. You can find a drill, hammer drill, combi drill, and SDS drills. So when you are drilling into the tile, you should have both hammering and spinning mechanisms. Hammering action is needed for drilling inner materials.
Suitable drilling speed is 500-800 RPM for 1/8″ to 1/2″ and 100-200 RPM for 2-3/4″to 3″. You can use mid-range value for drilling holes between 1/8″ to 3″.
SDS hammer drills are not suitable for this. because its hammer action is much power, and sometimes tile can be cracked due to this. And also, it is a bit difficult to handle. So using SDS is not a wise solution.
2. Select the Suitable Drill Bit for Tiles
Suitable drill bits should be selected. There are types of drill bits in the market. But you should select a suitable drill bit for drilling the tiles. There are masonry and carpentry drill bits. Those may not be used for drilling tiles because of their strength.
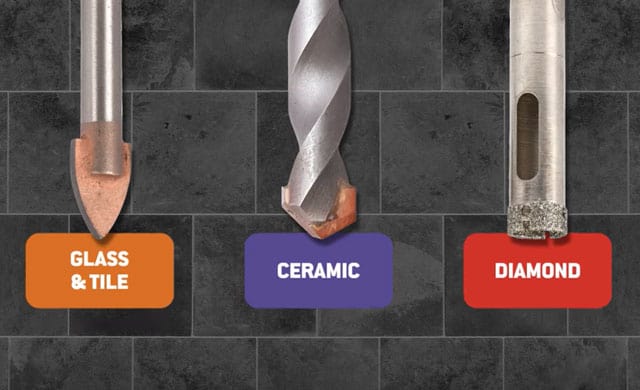
You can use the drill bits for glass and tile ceramics and diamonds.
- Glass and tile (Tungsten carbide tip) – For drilling into the glass, mirror, and tiles up to class3
- Ceramic (Asymmetrical tungsten carbide tip) – For drilling into ceramic and porcelain tiles up to class 4
- Diamond (Diamond embedded core) – For drilling into tiles up to class 5 including granite.
3. Mark the Place and Pilot Hole on the Tile
When you are going to drill, you should have the pilot hole if you are expecting to drill more diameter holes. As well as if you use a diamond drill bit, you must have the pilot hole. The tile is very fragile. So punching a drilling point is not a suitable method. When you punch, the tile can be cracked.
So you can angle the drill and make a small pilot hole with the spinning drill bit. This is essential for diamond hole drilling. Else it will move here and there.
4. Start Drilling on the Tile
Follow the below steps when you start drilling on the tile.
- Mount the drill bit to the drilling machine. When you are mounting you must consider the inner materials also. You can use the diamond or carbide drill bits for drilling the tile.
- But if you need to drill further you should use any other drill bit. Sometimes, diamond bits or glass and tile bits will not perform well. If there is wood, select the carpentry drill bit as the second one.
- When you are drilling you should follow this. There are two options in a hammer drill. Regular drill option and hammering mode. Make sure you have switched off the hammering action. If the hammering action is activated the tool can be a break and the drill will move here and there.
- Start the drilling in gentle ways slowly. Do not use high speed. Start slowly until the drill bit damages the tile outer layer.
- Do not push into the drill too much. When you push the tile, it can crack easily. Do not rush
- Make sure there is no plumbing or electrical conduit behind the tile.
- If you use a small drill bit for the pilot hole use a larger diameter drill bit.
- Do not drill continuously as the drill bit heated more and more. Use water to cool the drill bit.
5. Remove Dust in the Drilled Tile Hole
When you drill, the dust is the debris of the drilling. So you can use any method for removing the dust. If you can spray some water into the drilling hole, you will not have the dust. All dust will be mixed with water. So water is a real solution.
6. Mount the Plug or Anchor into the Tile Hole
After you finish the drilling tile, you have to drill the inner material. The inner material can be concrete or brick. So you should follow these guides for concrete and brick drilling. In this step, you can use the same drill bit with hammer mode. Do not angle the drill with hammer mode. It will break the tile. Inner materials can be easily drilled with hammering mode.
When you use the same drill bit for this, you can do it easily. After the drilling process is over, mount the plugs or anchor as you wish.
What you Should Avoid While Tile Drilling?
You should avoid these 5things while you are drilling tiles.
- Using the wrong drill bit for tile drilling – This is the most common mistake made by DIY enthusiasts. Using a standard drill bit on tiles can lead to cracks and breaks. Instead, use a drill bit designed for tiles, such as a carbide or diamond-tipped one.
- Drilling tiles at high speed – High speeds generate heat, which can crack or shatter the tile. Always start drilling at a slow speed and gradually increase it if necessary.
- Applying too much pressure on the tile – Applying excessive pressure while drilling can cause the tile to crack. Let the drill do the work and apply only enough pressure to keep the drill bit in place.
- Drilling tile without water – Drilling generates heat, which can cause tiles to crack. To prevent this, keep the area you’re drilling wet. This will help to keep the drill bit and the tile cool.
- Drilling too close to the tile edge – Drilling near the edge of a tile is risky because it can easily lead to cracking. Always try to drill as far away from the edges as possible.