Miter saws are an essential cutting tool. It is mostly used in the woodworking industry for high-accuracy crosscuts and bevel cuts. Due to its lightweight and high performance it can be used easily. When we use a miter saw, we must know each part and its functions in order to have a proper idea, maintenance, and repair of the tool. I will explain all in detail about a miter saw parts and functions step by step.
There are common parts in every tool. Some functions and parts are specially designed for certain kinds of tools and brands. So let’s take a look at the miter saw and the functions of its parts.
What are the Main Parts and their Functions of a Miter Saw?
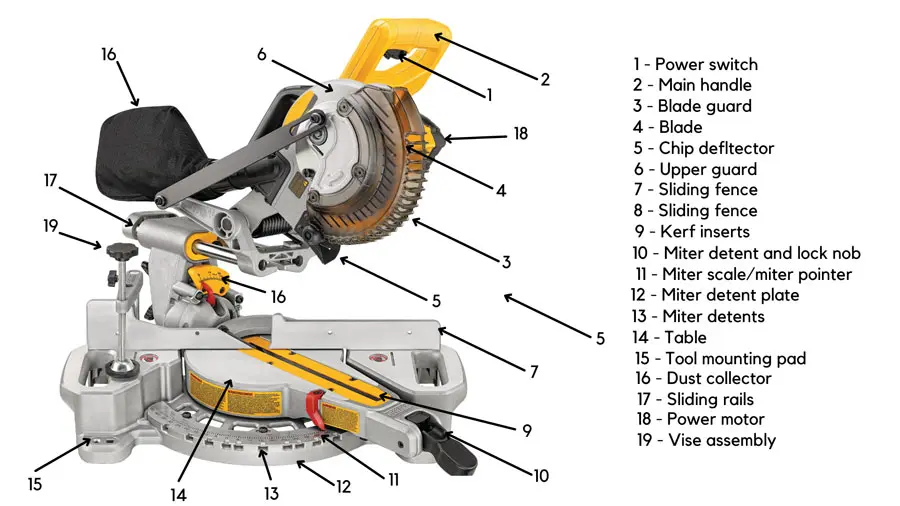
These the 20 main parts of the miter saw and their functions
01 – Power Switch
The power switch can power up the tool. It is consists of a Lock-Off release button also.
02 – Main Handle
The main handle is used to operate the saw blade. The handle can pull down the blade, and it can push and pull horizontal positions of the blade
03 – Blade Guard
Blade guard helps to user to protect the fingers and hands by damaging. It retracts as the blade is
lowered. Lip can be used to raise the lower guard in the event that the guard becomes jammed on
a workpiece
04 – Blade
The blade is the cutting tool of the miter saw. Blades are with different diameters, and those are made with different materials. Normally we can use 10 inches and 12-inch blades. According to the number of teeth, and diameter these blades can be categorized.
05 – Chip Deflector
Deflects and cut-off chips dust will enter the upper part of the blade
06 – Upper Guard
This guard can cover the upper portion of the blade.
07 – Sliding Fence
The sliding fence can support the workpiece. Some fences are cast in scale to make repetitive cuts easy. The fence also has holes to secure an auxiliary fence if desired.
08 – Stationary Fence
If the sliding fence is removed, the stationary fence can support the workpiece.
09 – Kerf Inserts
Kerfs space helps to fully cut and separate the workpiece. According to the kerf space, tearings can be visible. Hence it is better to use narrow kerfs.
10 – Miter Detend and Lock Nobs
The miter detent can adjust the micro-adjustment of the blade in any position angle, and the lock nob can lock and tighten the kerf insert.
11 – Miter Scale/ Miter Pointer
The Miter pointer rotates with the table and blade. The pointer can indicate the exact angle to be cut.
12 – Miter Detent Plates
Detent locations can be used as high-accuracy angle positions
13 – Miter Detents
There are ten miter detent slots for fast and accurate miter cuts of common miter angles.
14 – Table
Sits in base, provides workpiece support, rotates for desired miter cuts and rotates the head assembly. The front extended part of the table is called the miter arm.
15 – Tool Mounting Pad
The tool mounting pad allows to clamp, bolt or nail the saw to a flat work surface
16 – Dust Collector
Dust and chips are collected in this bag. This is very important for the miter saw.
17 – Sliding Rails
Sliding rails allow to saw head pull and push horizontal movements.
18 – Power Motor
The powerful motor is used to generate the rotational power to the miter saw.
19 – Vise Assembler
This can be used to tighten the workpiece with the tool.
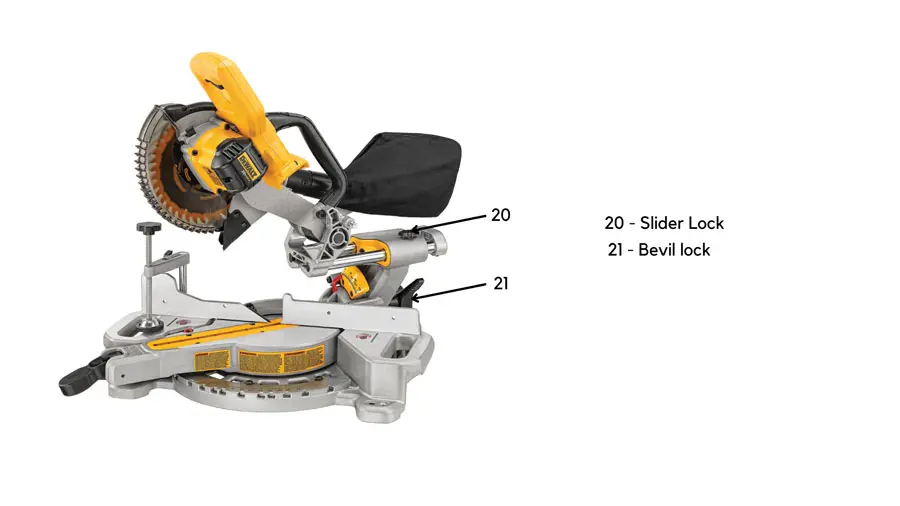
20 – Slider Lock
The horizontal slider can be locked with the slider lock easily.
21 – Bevel Lock
The blade can be locked in any bevel position.
These are the main parts of the miter saw. These parts can be seen in any tool. Specific types of miter saw parts are specially designed for the specific miter saw types. Miter saw types can be varied according to the usage.
What are the Most Damaged Parts of a Miter Saw?
These are the common 8 damage parts and damages in the miter saw.
- Miter saw blade – Miter saw blade can get worn down, dull, or damaged over time.
- Miter saw power cord – Miter saw power cord can be damaged by overtightening, cutting and burning while working.
- Miter saw motor – The miter saw motor can burn out or get damaged due to heavy usage, incorrect power supply, or unresolved maintenance issues.
- Miter saw safety guard – Miter saw safety guards can be damaged by heavy use, accidents, or improper handling.
- Miter saw handles – Miter saw handles can wear and tear and can break down with use.
- Miter saw gauge – Miter saw gauge can become less accurate over time due to wear and tear.
- Miter saw base plate – The miter saw base plate can be damaged while supporting the material cutting.
- Switches and controls in the miter saw – Miter saw switches and controls can be damaged when it is used prolonged.