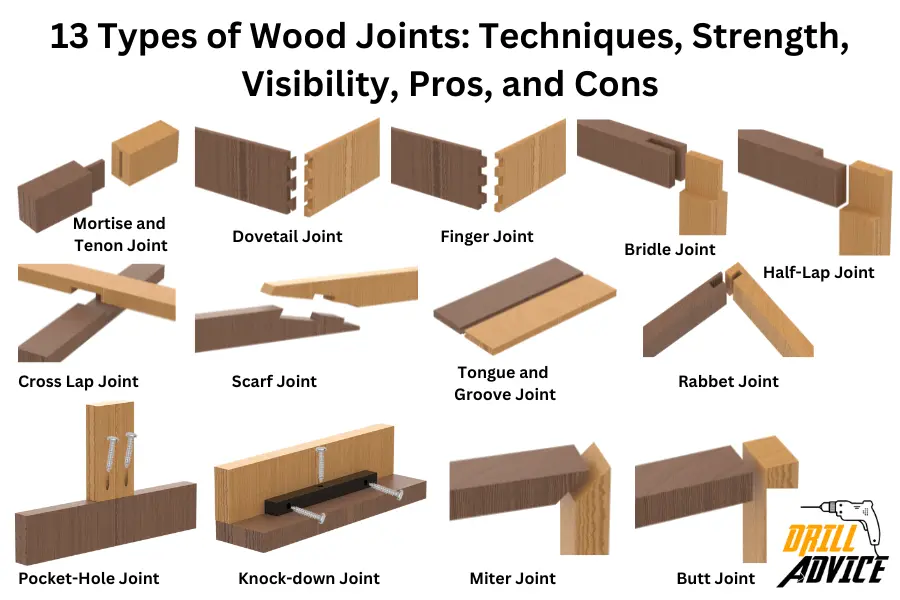
A wood joint is a connection of two or more woods together using a specific cutting technique. According to the cutting techniques, strength, and visibility, wood joints are mainly 13 types. Those are Mortise and Tenon joint, Dovitail joint, Finger joint, Bridle joint, Half lap joint, Cross lap joint, Scarf joint, Tongue and Grove Joint, Rabbet Joint, , Pockethole Joint, Knockdown Joint, Miter Wood Joint, and Butt Joint,
The wood joint technique is a step-by-step process to make the joint using relevant tools. Each type of wood joint use different types of woodworking tools and method. A properly made wood joint should have sufficient strength to withstand the structure with external forces. The visibility of the wood joint is very important to show the aesthetic look of the wood product. Each wood joint has specific pros and cons. Before use a wood joint, you should know everything.
What Should I Know Before Making a Wood Joint?
You should know in depth before making a wood joint about the type of wood joint, the technique of the wood joint, the strength of the wood joint, the visibility of wood joint, and the pros and cons of the wood joint.
The Technique of Wood Joint
Among these 13 Types of wood joints, the least techniques are used in Butt joint. The Butt joint is the easiest wood joint with fewer woodworking tools. Therefore butt joint is good for woodworking starters. The hardest wood joint is the mortise and tenon joint. It needs expert-level skills and tools.
The most important thing of the wood joint is marking and cutting. Both task should be done carefully and precisely. Woodworkers do not need to use old tools for the woodworking joints. They can use modern tools for precise and accurate cutting for the wood joints.
Read More About – 13 Types of Wood Drill Bits
The Strength of Wood Joint
Wood joint strength varied with the connection type, gluing area, removing materials, connected materials and outer connection for the wood joint. The strongest wood joint is the mortise and tenon joint. The least-strength wood joint is the Butt joint.
Other types of wood joints are varied like this graph. To improve the strength of wood joint woodworkers use glue. The gluing strength is improved with the area of the gluing surface.
Visibility of Wood Joint
The visibility of the wood joint is a factor of the expertness and experience of the woodworker. Woodworkers try to hide the wood joint as much as possible by matching the grain patterns of both wood pieces. Therefore woodworkers use wax, oil, glue to hide the visibility of the joint. But furniture need creative wood joints such as mortise and tenon joint to improve its aesthetic value.
Pros and Cons of Wood Joint
Each wood has pros and cons. Both pros and cons are related to techniques, strength, and visibility. Before choosing a wood joint, its pros and cons should be carefully identified in order to make a strong and more aesthetic wood product.
Read More About – Know about Wood: Types, Properties, Usage, Damages, Protection
What are the 13 Types of Wood Joints?
Mortise and Tenon Joint
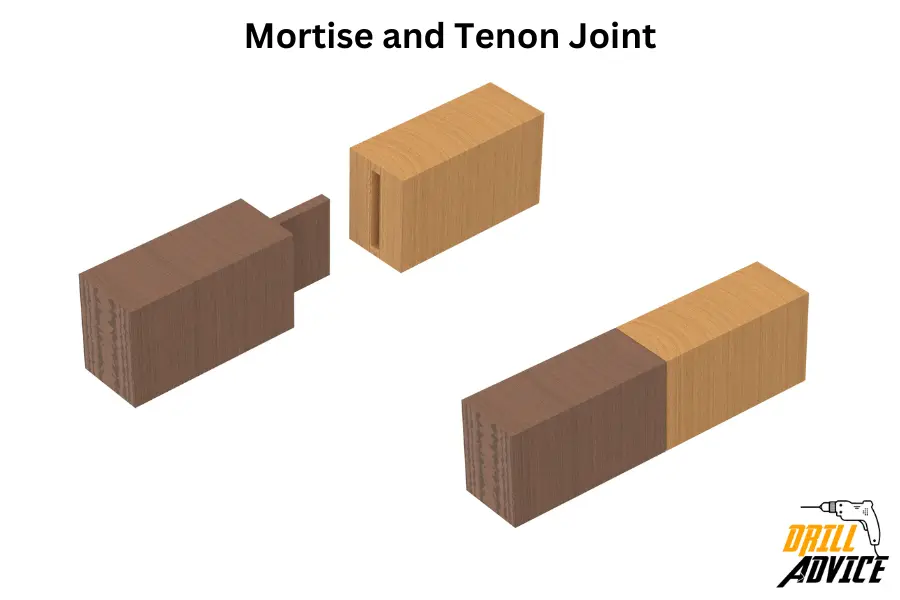
The mortise and tenon joint consists of two components. Those are mortise holes and the tenon tongue. The mortise is a hole or recess that is cut into one piece of wood, while the tenon is a projecting piece on the end of another piece of wood. The tenon is designed to fit snugly into the mortise.
Technique of Mortise and Tenon Joint
- The first step is to mark out the mortise and tenon. It should be marked accurately on both pieces of wood.
- The next step is to cut out the mortise. This is typically done with a mortising machine, but it can also be done with a drill and chisel.
- The tenon is then cut on the other piece of wood. This can be done with a handsaw or a tenon saw.
- Once both the mortise and tenon have been cut, they should be checked for fit. The tenon should slide into the mortise with some resistance but without having to force it.
- Finally, the joint is glued together and clamped until the glue dries.
Advantages of Mortise and Tenon Joint:
- Very strong: The mortise and tenon joint is the strongest joints in woodworking.
- Widely used: It can be used in many different applications, from furniture to timber framing.
- Creates clean lines: When executed well, the mortise and tenon joint can create a very clean and professional appearance.
Disadvantages of Mortise and Tenon Joint
- Requires precision: For the joint to be effective, the mortise and tenon must fit together perfectly. This requires precise measuring and cutting. Therefore Mortise and tenon joint is a bit challenging to beginners.
- Consume time – Mortise and tenon joint need more labour-intensive and time-consuming compared to other types of wood joints.
- Requires specific tools: Tenon joint can be created with basic tools. But using a mortising machine or a tenon saw will make the process easy.
Visibility of Mortise and Tenon Joint
When constructed properly, a mortise and tenon joint can provide a clean and seamless look. The joint is often hidden within the structure. In some designs, however, the tenon is left exposed for a rustic or artisanal aesthetic.
Dovetail Joint
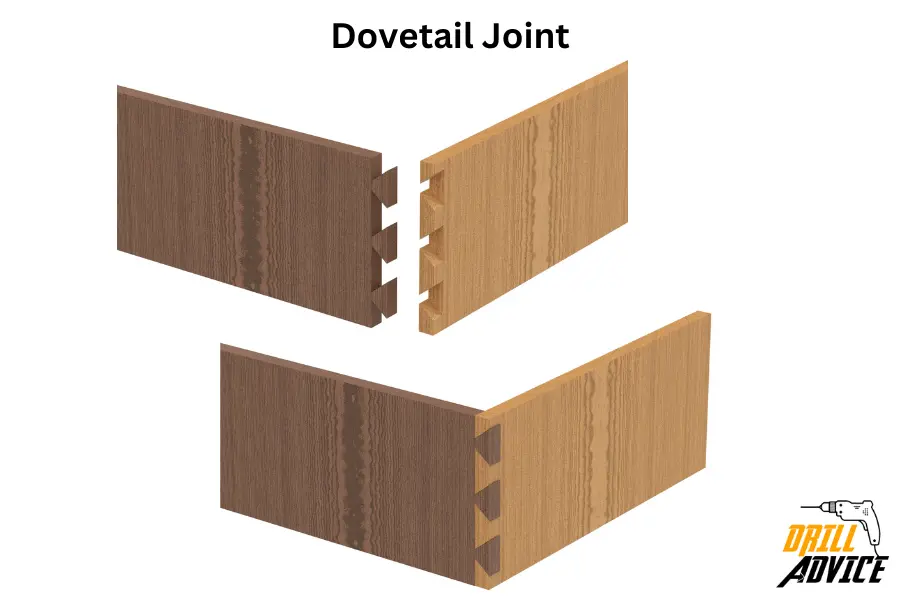
Dovetail joint consists of two main components such as pins and tail. The tail, cut into one piece of wood, Its one end it wider and narrow at the other. It looks like a dove’s tail. Pins are cut into the second piece of wood, and these are designed to interlock perfectly with the tails.
The technique of Dovetail Joint
- First, mark the dovetails’ location and size on both pieces of wood.
- Cut along these markings on the first piece of wood to create the tails, the projecting parts of the dovetails.
- Place the first piece of wood onto the second, using the tails as a template to mark out the pins, the recessed parts of the dovetails.
- Use these markings as your guide, and cut out the pins on the second piece of wood.
- Fit the tails and pins together. You can use wood glue to secure the joint.
Advantages of Dovetail Joint
- Higher Strength: The interlocking design of pins and tails provides a higher wood joint.
- Aesthetic Appeal: The intricate design can be a visual feature and a sign of high-quality craftsmanship.
- High Durability: Dovetail joints are highly resistant to being pulled apart. Therefore It is more durable.
Disadvantages of Dovetail Joint
- Much Complexity: Dovetail joints can be complex and difficult to cut correctly due to their cutting pattern.
- Higher Time-Consuming: Crafting a dovetail joint often takes more time compared to other types of joints.
- Need for Specific Tools: Need specific tools such as a dovetail saw or dovetail jig for accurate construction of dovetail joints
Visibility of Dovetail Joint
- The dovetail joint has a unique geometric design.
- The interlocking design of tails and pins can be highlighted by using different types of wood. It provides the wood craftsmanship of the woodworker.
- Higher strength and aesthetic vies it use for high-quality furniture construction.
Finger Joint
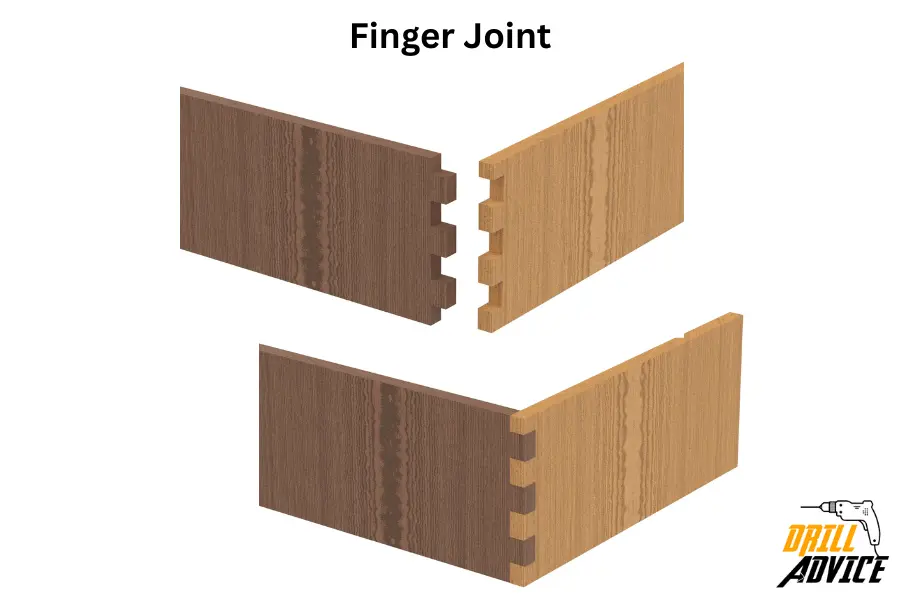
The finger joint is a series of interlocking cuts (the “fingers”) on the ends of two pieces of wood. These fingers are typically rectangular but can be cut in other shapes as well. The fingers interlock, fitting together like the fingers of two clasped hands.
Technique of FingerJoint
- First, mark the fingers on both pieces of wood accurately.
- Then cut the fingers using a table saw or a router with a finger joint jig.
- Check the fit of the joint. The fingers should interlock neatly with just a little resistance. If it’s too loose or too tight, you’ll need to adjust your cuts.
- Apply wood glue to the joint, assemble the fingers, and then clamp the joint until the glue dries.
Advantages of FingerJoint
- Good Strength: The finger joint provides good strength. But not like dovetail joints. finger joints still provide a good amount of mechanical strength.
- Efficient Use of Material: Finger joints are often used to join shorter pieces of wood into a longer one. This is efficient material use.
- Increased Gluing Surface: The interlocking fingers provide a large surface area for glue. A large surface area can improve the strength of the joint.
Disadvantages of FingerJoint
- Aesthetics: While some people find the look of a finger joint appealing, others may find it less attractive than joints like the dovetail.
- Need high Precision: The fingers must be cut accurately for the joint to fit together correctly. This can be challenging without the right tools.
- Requires Specific Tools: To make the process of cutting the fingers easier, specific tools like a finger joint jig are often used.
Visibility of FingerJoint
A finger joint can be quite distinctive visually, with its series of interlocking fingers. A finger joint can add a unique pattern to the edge of a piece, particularly when contrasting types of wood are used. Finger joint is used in projects where strength and efficient use of materials are more important than aesthetics.
Bridle Joint
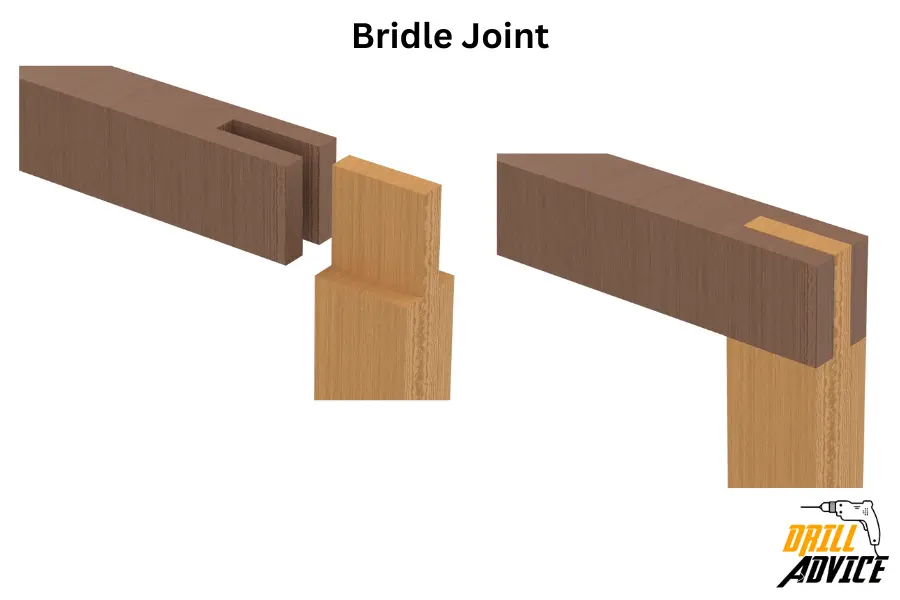
The bridle joint consists of a tenon member. It is typically cut on the end of one piece of wood. Other part is the mortise member. It is a three-sided slot cut into the end of the other piece. Then tenon fits inside the mortise. Bridle joint is a stong wood joint.
The technique of Bridle Joint
- First, mark the joint dimensions on both pieces of wood.
- Next cut a tenon on the end of the first piece of wood. This is typically done using a table saw or a bandsaw.
- Then create a mortise on the second piece of wood, cutting a slot that matches the size of the tenon. You can use a handsaw and a chisel for this process.
- Finally, test the joint by fitting. The tenon should slide into the mortise with slight resistance. If it’s too loose or too tight, make the necessary adjustments.
- Apply wood glue to the joint, assemble the pieces, and then clamp them until the glue dries.
Advantages of Bridle Joint
- Strong Joint: The bridle joint is very strong due to the large gluing surface area and the mechanical interlock.
- Wide range of use: Bridle joint can be used in various applications, from framing to cabinetry.
- Easier to Cut: It’s generally easier to cut than some other types of joints, like the dovetail joint.
Disadvantages of Bridle Joint
- Aesthetics: The joint is visible from two sides, which might not be desirable in some projects.
- Precision Required: The mortise and tenon must be cut precisely to ensure a tight fit.
- Not a Strong Wood Joint: Bridle joint is not as strong as some other types of joints, like the mortise and tenon joint.
Visibility of Bridle Joint
A Bridle joint is more aesthetic when it is made properly. It can present a neat, finished appearance, but it is not generally considered as visually appealing as some other types of joints. It can be more visually appealing if made using contrasting woods.
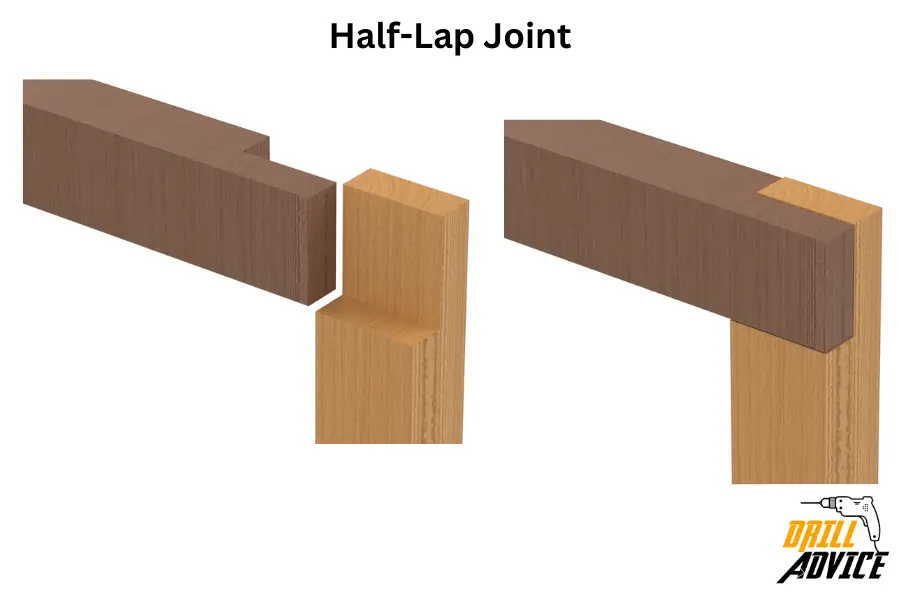
Half-Lap Joint
Absolutely, let’s take a closer look at the Half-Lap Joint.
The technique of Half Lap Joint
- First, determine where the joint will be and mark it on both pieces of wood. Both pieces should overlap at this point.
- Remove half the thickness of each piece of wood at the marked location. You can use a table saw, a circular saw, or a chisel for this process.
- Check the fit of the joint. When placed together, the surfaces of both pieces should be flush with each other.
- Apply wood glue to the joint, assemble the pieces, and clamp them until the glue dries.
The Geometry of Half Lap Joint
The half-lap joint is two pieces of wood overlapping at the joint. Half the thickness of each piece is removed where they overlap, allowing the two pieces to fit together flush. When viewed from the side, the joint resembles the letter “T”.
Advantages of Half Lap Joint
- Simple to Create: The half-lap is a relatively simple joint to cut and fit, making it accessible to beginners.
- Maintains Width: Unlike some joints that can reduce the width of the assembled pieces, a half-lap joint keeps the original width intact.
- Good for Framing: The half-lap is particularly useful for framing and creating flat surfaces.
Disadvantages of Half Lap Joint
- Less Strength: The half-lap joint is not as strong as some other joints because it removes some material from each piece of wood.
- High visibility: The joint will be visible from the sides, which might not be desirable in some projects.
- Needs Accurate Thickness Removal: You have to remove exactly half the thickness of the wood for the joint to fit together correctly.
Visibility of Half Lap Joint
The half-lap joint has a practical, straightforward appearance. It does not add much in terms of decorative value, as it is typically visible from the side and top. However, when made with accuracy, it provides a flush and clean connection between pieces. The simplicity of its design can be desirable in minimalist or functional pieces where the focus is on the overall form rather than the details of the construction.
Cross Lap Joint
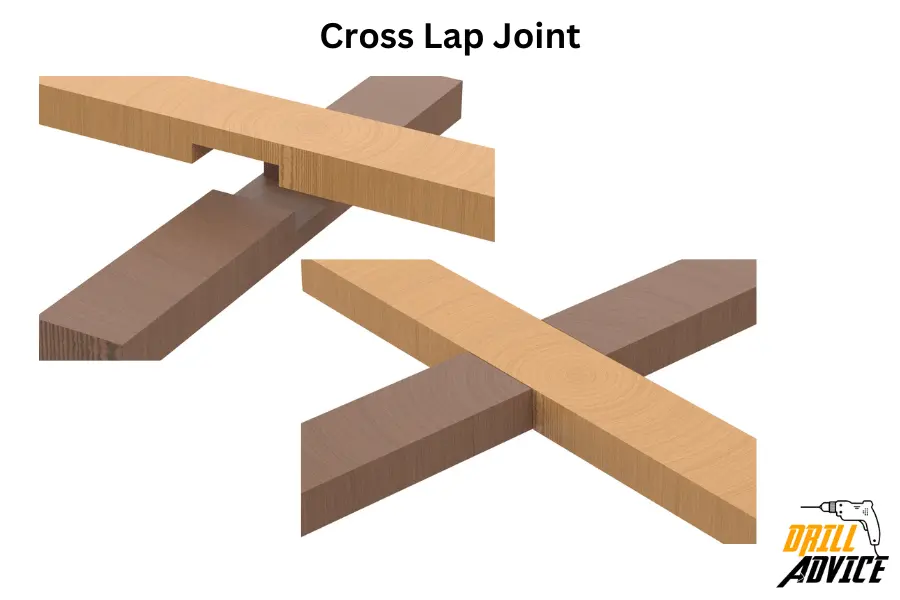
The cross lap joint involves two pieces of wood intersecting each other, usually at right angles, but not always. Half the thickness of each piece is removed where they intersect, allowing the two pieces to fit together flush. When viewed from above, the joint appears as a cross.
The technique of Cross Lap Joint
- Mark out where the two pieces of wood will intersect with each other. Make sure to measure accurately for a snug fit.
- Remove half the thickness of each piece of wood at the marked location. This is typically done using a table saw or a chisel.
- Check the fit of the joint. The two pieces should fit together flush at the intersection.
- Apply wood glue to the joint, fit the pieces together, and then clamp them until the glue dries.
Advantages of Cross Lap Joint
- Simplicity: The cross lap is a relatively simple joint to cut, making it accessible to beginners.
- Versatility: Cross-lap joints can be used in a variety of applications, such as shelving or framing.
- Good Flat Connection: The joint creates a flush connection between pieces, useful when flat surfaces are desired.
Disadvantages of Cross Lap Joint
- Reduced Strength: The joint is not as strong as some others because it requires removing some material from each piece of wood.
- Visibility: The joint is visible from both sides, which may not be desirable in certain projects.
- Requires Precise Cuts: The joint’s success depends on the accurate removal of half the wood’s thickness for a proper fit.
Visibility of Cross Lap Joint
The cross lap joint provides a clean and orderly look when the pieces are assembled. The joint is visible from the top and bottom, revealing the intersection of the two pieces. While it lacks the decorative appeal of some other joints, its straightforward design can complement projects that lean towards functionality or a minimalist aesthetic. Its utilitarian appearance can also be used to advantage in design styles that celebrate the “nuts and bolts” of construction.
Scarf Joint
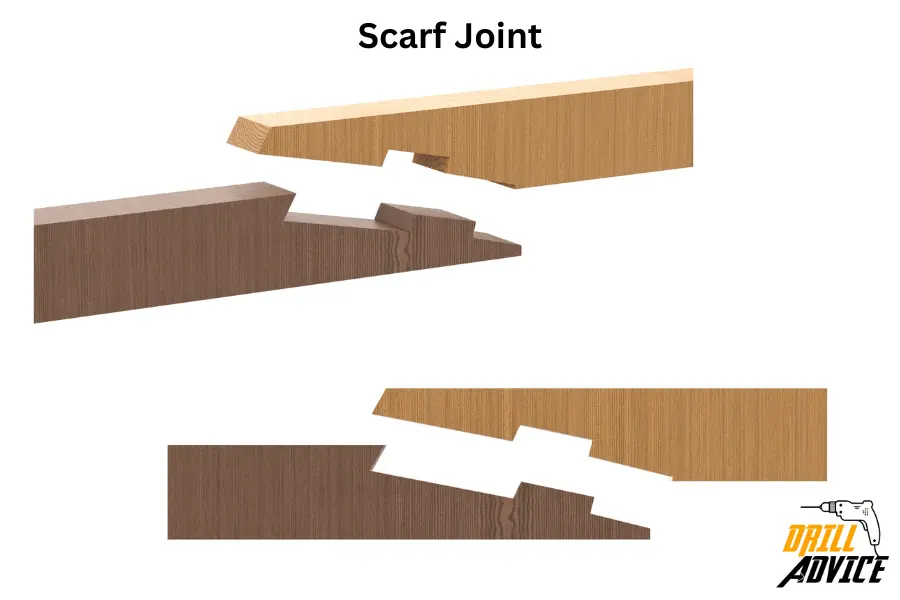
The scarf joint is two pieces of wood that overlap each other at an angle, rather than square as in a lap joint. The geometry of the joint is designed to provide a large glueing surface area for strength and to maintain the alignment of the grain of the wood for aesthetic purposes.
The Technique of Scarf Joint
- Mark the location of the joint on both wood pieces. The two pieces will overlap at this point.
- Cut matching bevelled or tapered ends on each piece of wood.
- Test the fit of the joint. The beveled or tapered ends should match exactly for a flush fit.
- Apply wood glue to the joint, join the pieces together, and secure them with clamps until the glue dries. For additional strength, screws, nails or bolts may be used.
Advantages of Scarf Joint
- Effective in Long Spans: Scarf joints are often used when the required length of material exceeds available lengths.
- Maintains Uniformity: Unlike some joints, a scarf joint can keep the direction of the grain consistent, which is important in some woodworking or construction applications.
- Provides Large Glue Surface: The joint design provides a large surface area for gluing, which can increase its strength.
Disadvantages of Scarf Joint
- Less Strength: Scarf joints, while useful, are not the strongest type of joint and may need to be reinforced with screws or other fasteners.
- Complexity: Cutting the bevelled or tapered ends requires precision and skill, making this joint more complex to create than others.
- Fewer Aesthetics: Depending on the project, the angled joint may be visible and less appealing than other types of joints.
Visibility of Scarf Joint
The scarf joint can be a invisible joint of the wood grains are well matched. This makes it useful in projects where a long, continuous piece of wood is desired. However, if the grain is not well matched or the joint is not well made, it can be quite noticeable.
Tongue and Groove Joint
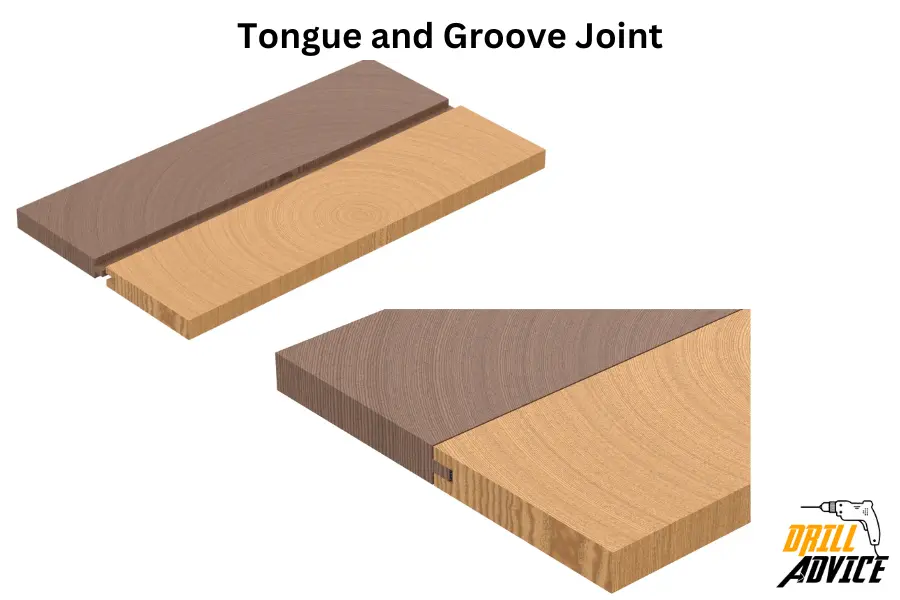
The tongue and groove joint has two pieces of wood. One piece has a ridge or “tongue” along one edge. Other piece have a slot or “groove” along an edge. The tongue fits into the groove, creating a joint that can hold two panels edge-to-edge or at a right angle.
The Technique of Tongue and Groove Joint
- Determine where the joint will be and mark it on both pieces of wood. One piece will have the “tongue” and the other the “groove”.
- Use a router or table saw to cut the groove down the length of one piece of wood. This groove must be centred and should be cut to half the thickness of the wood.
- Similarly, cut the tongue on the edge of the other piece of wood. The tongue should fit snugly into the groove.
- Test the fit of the joint. The tongue should fit snugly into the groove with minimal lateral movement.
- Apply wood glue to the joint, fit the pieces together, and then clamp them until the glue dries.
Advantages of Tongue and Groove Joint
- Well Aligned: The design of the joint helps keep the boards aligned, preventing warping and twisting.
- Good for Paneling & Flooring: This joint is particularly well-suited for constructing wide panels, such as tabletops, and flooring where you want a seamless surface.
- Easy to Mass Produce: With power tools, these joints can be quickly and accurately mass-produced.
Disadvantages of Tongue and Groove Joint
- Not Very Strong: On its own, the joint is not particularly strong and usually requires glue, nails, or other mechanical fasteners.
- Precision Required: The tongue and groove must be cut precisely to fit snugly together.
- Limited Use: While it’s great for panelling and flooring, this joint is less versatile than some others.
Visibility of Tongue and Groove Joint
The tongue and groove joint creates a smooth, continuous surface, with the joint itself almost invisible if executed properly. This can give a clean, uniform appearance to panelling or flooring.
Rabbet Joint
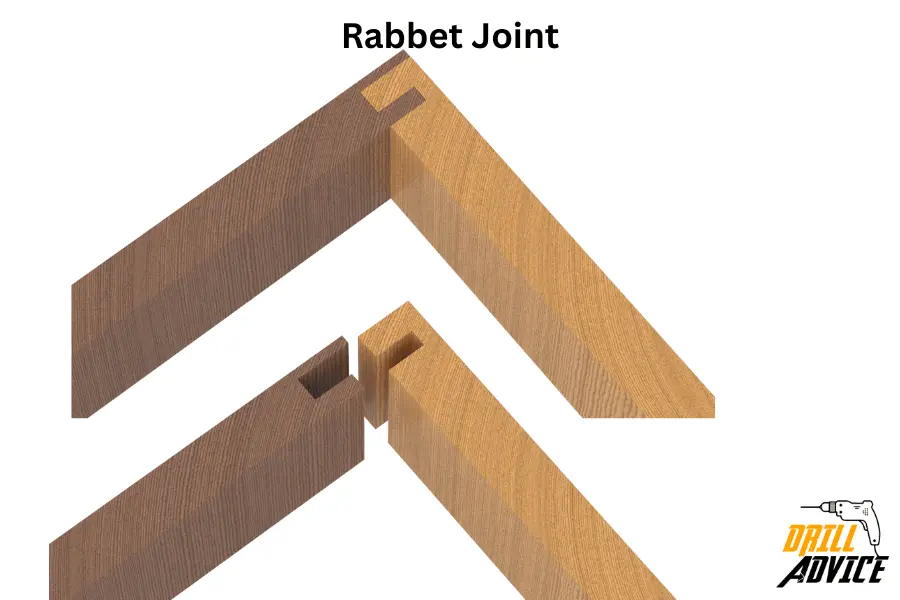
A rabbet joint is a recess or groove cut into the edge of a piece of wood. When used in joinery, a rabbet allows another piece of wood to sit flush with the recessed piece, often at a right angle. The adjoining piece fits into the rabbet, and the joint is typically secured with glue, screws, or nails
The technique of Rabbet Joint
- First mark it on your piece of wood.
- Then Using a table saw, router, or hand plane, remove a section along the edge of the wood. The width and depth of the cut should be determined by the dimensions of the adjoining piece.
- Check the fit of the joint. The second piece should sit flush with the original piece in the cut-out area.
- Apply wood glue to the joint, fit the pieces together, and clamp them until the glue dries.
Advantages of Rabbet Joint
- Simplicity: Rabbet joints are straightforward and easy to make, especially with power tools.
- Wide Range of Use: They are versatile and can be used in a variety of projects, from building boxes to framing.
- Enhances Structural Integrity: Rabbet joints can add strength and rigidity to a corner or joint.
Disadvantages of Rabbet Joint
- Fewer Aesthetic: This type of joint is visible and may not be as visually appealing as some other types of joints.
- Not Extremely Strong: While stronger than a butt joint, rabbet joints are not the strongest type of joint and may require reinforcement for heavy loads.
- Precision Required: The rabbet must be cut accurately to ensure a good fit with the adjoining piece.
Visibility of Rabbet Joint
Rabbet joints give a clean, utilitarian appearance. They’re not often used for their decorative appeal, but rather for their practicality and simplicity. When Rabbet joints are executed well, they provide a clean line where the two pieces join, which can contribute to a minimalist or modern aesthetic.
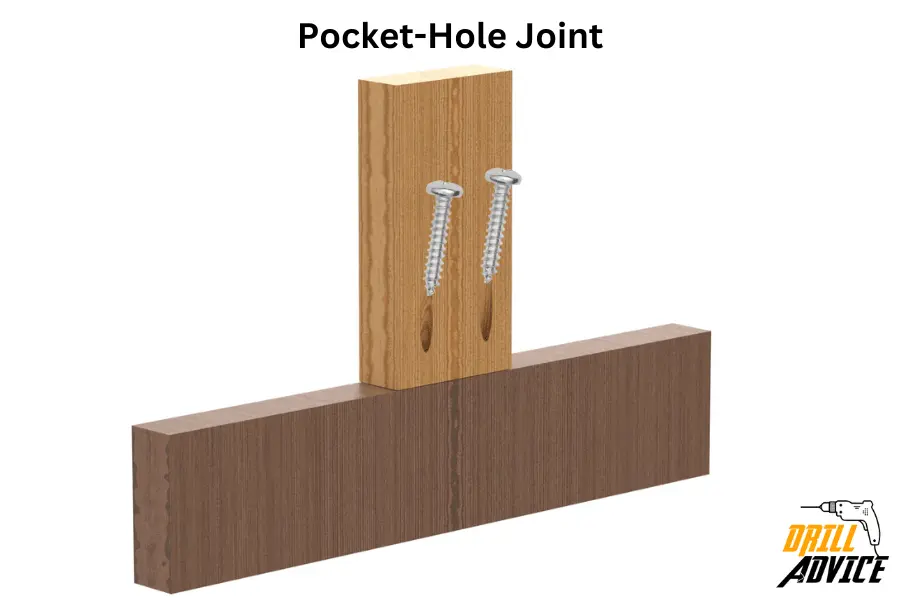
Pocket-Hole Joint
The technique of Pocket-Hole Joint
- First, you’ll need to mark the position on the piece of wood where you want to create the pocket hole. The placement will depend on your specific project needs.
- Use a pocket-hole jig to guide your drill bit at an angle into the wood to create the pocket hole. This jig ensures accurate angle and depth.
- Next, drill a hole at a steep angle through the width of one piece of wood. The hole should stop just before it exits the opposite side.
- Once the pocket hole is drilled, you can join it to the second piece of wood using a screw. The screw is inserted into the pocket hole and driven into the second piece of wood.
- Lastly, apply wood glue for additional strength, and clamp the joint until the glue dries.
The Geometry of Pocket-Hole Joint
The Pocket-Hole Joint is unique wood joint. It is made by drilling a hole at an angle into one piece of wood, then joining it to a second piece with a screw. The hole is typically drilled at a steep angle, and the screw pulls the two pieces of wood tightly together.
Advantages of Pocket-Hole Joint
- Quick and Simple: Pocket-hole joints can be made quickly with the correct tools, making them ideal for many types of projects.
- Strong: They are quite strong, particularly when used in combination with wood glue.
- Doesn’t Require Many Clamps: Since screws hold the pieces together while the glue dries, you don’t need as many clamps as some other methods.
- No Special Skills Needed: This type of joint is easy for beginners to make, as it doesn’t require the high degree of skill that some other joint types do.
Disadvantages of Pocket-Hole Joint
- Visibility: One downside to pocket-hole joints is that the holes are often visible. However, you can use plugs or caps to cover the holes, or ensure they are on the back or bottom side of your project.
- Special Tools: While the technique is simple, it does require a special tool – a pocket hole jig. Without this, it can be difficult to get the correct angle and depth for the hole.
- Not for Heavy Loads: While a pocket-hole joint is strong, it’s not recommended for heavy-duty structures.
Visibility of Pocket-Hole Joint
A Pocket-Hole Joint is more functional than decorative. The holes can be visible, which some people don’t like. However, if the pocket holes are placed in non-visible areas, or filled with wooden plugs, they can be virtually invisible.
Knock-down Joint
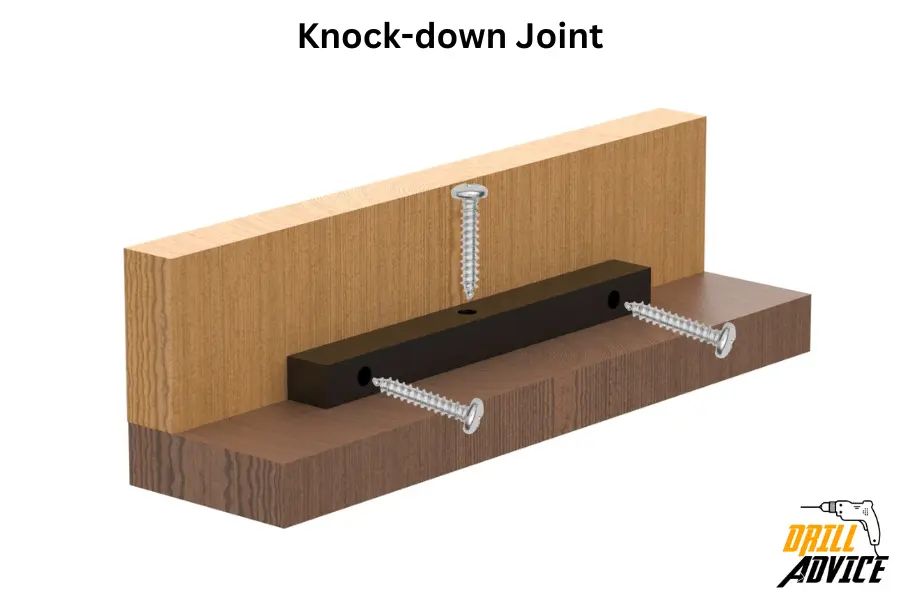
Knock-down joints is a broad category of joinery methods that allow for easy assembly and disassembly of a piece of furniture or other wood product. They usually involve metal hardware such as screws, brackets, or special fittings designed for the purpose. The geometry varies greatly depending on the specific type of hardware and the function of the joint.
Technique of Knock-down Joint
- Determine where the knock-down joint will be located and mark the positions on both pieces of wood.
- Depending on the specific type of knock-down hardware you’re using, you’ll typically drill holes or install brackets in the appropriate locations.
- After installing the knock-down fitting, assemble the pieces of wood together according to the manufacturer’s instructions. This usually involves aligning the pieces and then tightening a screw or bolt.
- To disassemble, simply reverse the process.
Advantages of Knockdown Joint
- Easy Assembly and Disassembly: The primary advantage of knock-down joints is that they can be easily assembled and disassembled, making them great for flat-pack furniture or temporary structures.
- No Glue Required: They often don’t require glue, which further simplifies assembly and disassembly.
- Versatility: There’s a wide range of knock-down hardware available for different applications.
Disadvantages of Knockdown Joint
- Visual Appeal: Knock-down joints tend to be less aesthetically pleasing than traditional woodworking joints, as they often involve visible hardware.
- Less Durability: While they are strong enough for many uses, they tend not to be as durable or robust as traditional permanent joints, particularly for heavy or frequently-used items.
- Requires Hardware: These joints require the purchase of specific hardware, which may not always be readily available or might not fit the aesthetic of a piece.
Visibility of Knockdown Joint
In terms of visual effect, knock-down joints generally prioritize function over form. The metal hardware used in such joints is typically visible. It may detract from the aesthetic appeal.
Miter Joint
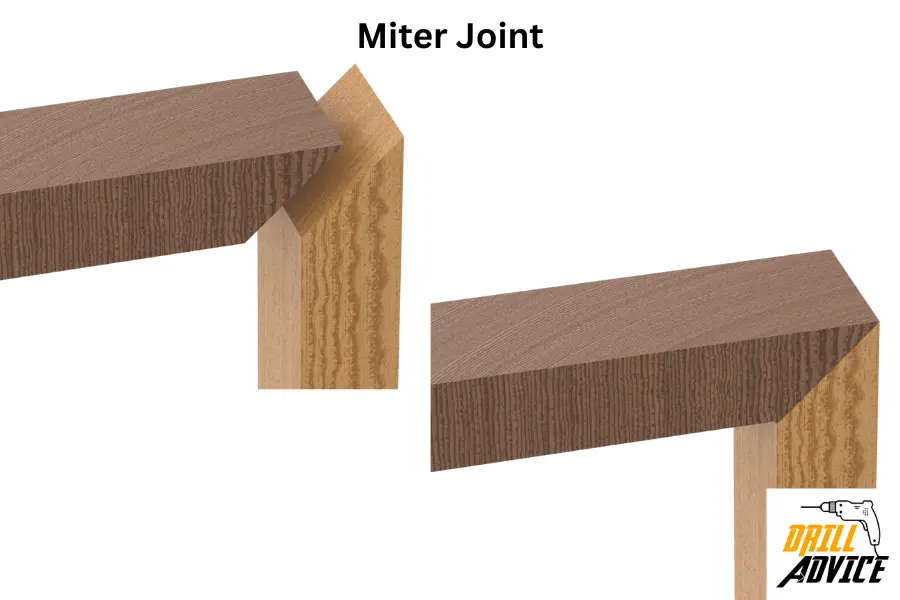
The miter joint is formed by two pieces of wood each cut at an angle, typically 45 degrees, and joined together. This forms a corner, usually a 90-degree angle. However, the miter joint’s angles can vary depending on the desired result, such as for an octagonal frame.
The technique of Miter Joint
- Determine where the miter joint is needed and mark the angles on both pieces of wood.
- Set the angle on your miter saw according to the required angle of the joint. For a basic miter joint, this is usually 45 degrees.
- Carefully cut along the marked lines. Ensure the cuts on the two pieces of wood are mirror images of each other.
- Apply wood glue along the cut edges, and join the pieces together.
- Secure the joint with clamps until the glue dries. For added strength, you can also use nails or screws.
Advantages of Miter Joint
- Aesthetically Pleasing: Miter joints can create a clean, smooth, and nearly invisible joint, especially when well executed.
- Wide Range of Use: They’re versatile and used in various woodworking projects, from picture frames to door frames.
- Hide End Grain: Miter joints hide the end grain of the wood, which can lead to a more finished and refined look.
Disadvantages of Miter Joint
- Requires Precision: Miter joints require precise cutting. A slightly inaccurate angle can result in gaps in the joint.
- Not Extremely Strong: With reinforcement, they’re stronger than other types of joints since they’re glued end-grain to end-grain, which doesn’t provide the strongest adhesion.
- Clamping Challenges: Clamping miter joints can be tricky, often requiring special clamps or jigs.
Visibility of Miter Joint
Miter joints are frequently used for their visual appeal. They provide a smooth, seamless corner and hide the wood’s end grain, leading to a more polished, finished appearance. They’re particularly common in picture and door frames and other applications where a clean corner is desired.
Butt Joint
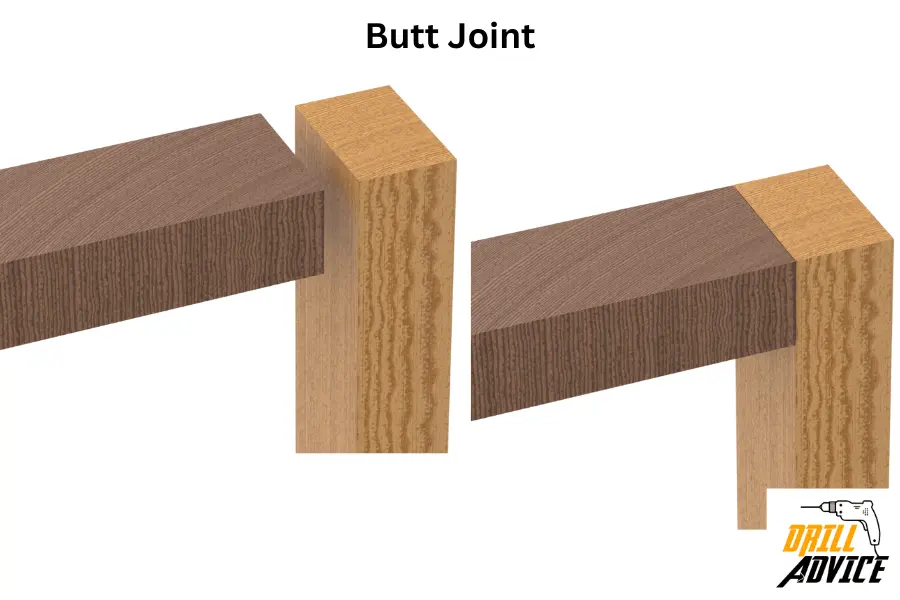
The Butt Joint is the simplest type of joint in woodworking, where the end of one piece is butted against the edge or end of another piece. The joining surfaces are usually perpendicular to each other.
The Technique of Butt Joint
- First, measure and cut the pieces of wood to the required length.
- Apply wood glue to the end of one piece of wood.
- Position the glued end against the face of another piece, making sure the edges are aligned.
- Secure the joint with clamps until the glue dries completely. For additional strength, nails or screws can be driven through one piece and into the end grain of the other.
Advantages of Butt Joint
- Simplicity: The Butt Joint is one of the easiest joints to make since it doesn’t require special tools or complex techniques.
- Quick: It’s quick to assemble, especially when using nails or screws.
Disadvantages of Butt Joint
- Weak: One of the main disadvantages of the butt joint is its weakness. The end grain-to-face grain connection could be stronger. It usually needs reinforcement with nails, screws, or dowels.
- Aesthetics: The end grain of the wood is visible in a butt joint, which some find less appealing.
Visibility of Butt Joint
A Butt Joint is simple and functional, with a less refined appearance than other joints as it doesn’t conceal the end grain of the wood. While it’s not typically chosen for its aesthetic appeal, it can be perfectly suitable in projects where simplicity and speed are more important than visual appeal.